Table of Contents
Custom AI Elements

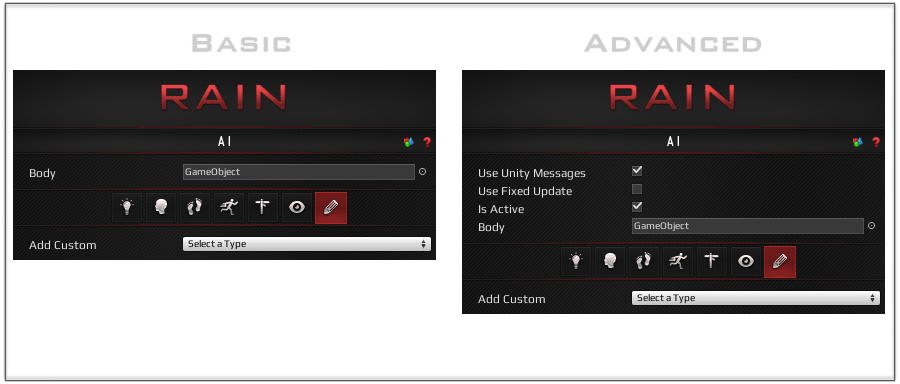
Properties
- Use Unity Messages (Advanced): Whether the AI is initialized and updated by Unity or done manually.
- Use Fixed Update (Advanced): Whether the AI responds to Unity Update or FixedUpdate messages. Only valid if Use Unity Messages is checked.
- Is Active (Advanced): Whether the AI is currently updating.
- Body: The GameObject that the AI will move and animate.
Actions
- Add Custom: If you have created any Custom AI Elements you can add them to your AI here.
Usage
Custom AI Elements allow you to add your own custom code into the AI pipeline. While you can also affect the AI externally through MonoBehaviours, sometimes it is useful and necessary to insert yourself between steps in the AI process, which isn't possible as a MonoBehaviour.
You can also use custom elements to expose behavior that you can use in your behavior tree (with Custom Actions), in any customized part of RAIN, as well as externally through the AI Rig.
Code
Custom AI Elements are done completely in code, and are considered an advanced feature of RAIN. In general you can always start with this following piece of code for any of your custom elements. You can put this in a script file in your project, and it will show up in the Add Custom list for your AI.
using RAIN.Core;
using RAIN.Serialization;
[RAINSerializableClass]
public class MyCustomAIElement : CustomAIElement
{
    public override void AIInit()
    {
        base.AIInit();
        // This is equivilent to an Awake call
    }
    public override void Pre()
    {
        base.Pre();
        // This is the very first step, usually at the beginning of the Update call
        // This happens right after the Motor calls UpdateMotionTransforms
    }
    public override void Sense()
    {
        base.Sense();
        // This happens right after the the Senses have updated any detected Aspects
    }
    public override void Think()
    {
        base.Think();
        // This happens right after the Mind has decided what actions to take
    }
    public override void Act()
    {
        base.Act();
        // This happens right after the Motor has applied any movement changes to the AI
    }
    public override void Post()
    {
        base.Post();
        // This is the last step, usually at the end of the LateUpdate call
        // This happens right after the Motor and Animator have updated animations
    }
}
In addition to the functions that are called you can also add many types of fields to your custom elements and expose them in the editor (or hide them, or show them only for advanced).
using RAIN.Core;
using RAIN.Serialization;
[RAINSerializableClass]
public class MyCustomAIElement : CustomAIElement
{
    [RAINSerializableField]
    private float _standardFloat = 1.2f;
    [RAINSerializableField(Visibility = FieldVisibility.ShowAdvanced, ToolTip = "An advanced float")]
    private float _advancedFloat = 4.5f;
    public override void AIInit()
    {
        base.AIInit();
        // This is equivilent to an Awake call
    }
}
You can also use custom classes for any of your fields by using the RAINSerializableClassAttribute and the RAINSerializableFieldAttribute.
using RAIN.Core;
using RAIN.Serialization;
[RAINSerializableClass]
public class MyCustomAIElement : CustomAIElement
{
    [RAINSerializableClass]
    private class MyInnerClass
    {
        [RAINSerializableField]
        private int _standardInt = 0;
        [RAINSerializableField]
        private string _standardString = "";
    }
    [RAINSerializableField]
    private MyInnerClass _innerClass = new MyInnerClass();
    public override void AIInit()
    {
        base.AIInit();
        // This is equivilent to an Awake call
    }
}
If you need to access your custom element from a Custom Action node you can use the AI parameter that is passed into the Start, Execute, End functions.
using RAIN.Action;
using RAIN.Core;
using UnityEngine;
[RAINAction]
public class LookAtTarget : RAINAction
{
    public LookAtTarget()
    {
        actionName = "LookAtTarget";
    }
    public override ActionResult Execute(AI ai)
    {
        // Grab our target from our memory
        GameObject tLookTarget = ai.WorkingMemory.GetItem<GameObject>("lookTarget");
        // We setup some custom look code as an AI element, so we're going to give it our target
        ai.GetCustomElement<SoldierLookAt>("HeadLookAt").LookAt(tLookTarget);
        // We also setup an additional instance for our weapon (with different params), so we'll assign that too
        ai.GetCustomElement<SoldierLookAt>("WeaponLookAt").LookAt(tLookTarget);
        return ActionResult.SUCCESS;
    }
}
If you need to access your custom element from a MonoBehaviour, you can use the AI Property on any AI Rig.
using RAIN.Core;
using UnityEngine;
public class SoldierSpawner : MonoBehaviour
{
    public void UnspawnSoldier(GameObject aSoldier)
    {
        AIRig tAIRig = aSoldier.GetComponentInChildren<AIRig>();
        // We'll clear our look ats since we're getting unspawned
        tAIRig.AI.GetCustomElement<SoldierLookAt>("HeadLookAt").LookAt(null);
        tAIRig.AI.GetCustomElement<SoldierLookAt>("WeaponLookAt").LookAt(null);
    }
}